I've said it before and I'll say it again: I'm no baker. Seriously, if you're searching for some beautiful work of culinary art, look away now. However, I've got to say that these turned out pretty awesome, aesthetically, for the amount of amateur ability that was put into them. They taste even better.
These cakes are the size of tin cans, which makes them really special and fun to serve. How'd I get them to be that size? Drum roll, please... I made them in tin cans! Really.
I had heard about baking desserts in tuna cans before, so when I wound up with 5 empty tin cans leftover from making chicken corn chowder for my boyfriend (he came down with a cold just a few days before his birthday), I decided that I should also bake his birthday cake in them.
The cans were from the corn I used in the chowder, so I was afraid that the cake would wind up smelling or tasting like corn. After a good scrub, however, the cans were corn-smell free, and they wound up tasting perfectly wonderful.

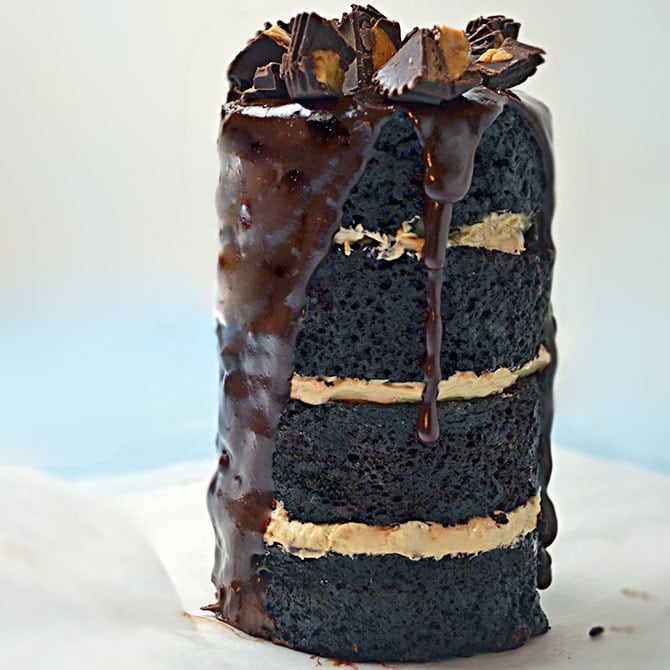
Really what makes these cakes special isn't their shape-- it's the taste. Flavorful, slightly bitter dark chocolate meets creamy peanut butter in an explosion of dessert-y goodness. You've got some rich, dark chocolate cake; layers of peanut butter frosting; a coating of dark chocolate peanut butter ganache; and some dark chocolate peanut butter cups to top it all off. This was only the third time I have ever even successfully made a cake from scratch, so don't be intimidated. If I can make these without messing them up, anyone can.
These would be a great treat for someone special on Valentine's day, by the way. I mean, who wants a cupcake when you can have a mini tower of cake instead?

Dark Chocolate Peanut Butter Can Cake
- Total Time: 1 hour 10 minutes
Description
Dark Chocolate and Peanut Butter come together in this sinfully delicious dessert made in tin cans!
Ingredients
- 5 empty soup, vegetable, or other tin cans
- Dark chocolate peanut butter cups, chopped, for topping (optional)
For the Dark Chocolate Cake (Adapted from mybakingaddition):
- 2 ¼ cups sugar
- 1 ¾ cups all-purpose flour
- ¾ cups unsweetened cocoa powder
- 3 tablespoons Hershey’s Special Dark Cocoa
- 2 teaspoons baking soda
- 1 teaspoon baking powder
- 1 teaspoon kosher salt
- 2 eggs
- 1 cup buttermilk
- 1 cup strong black coffee
- ½ cup vegetable oil
- 2 teaspoons vanilla extract
For the Peanut Butter Frosting:
- 4 tablespoons unsalted butter, softened
- ½ cup peanut butter
- 1 cup powdered sugar
- 2 tablespoons milk
For the Dark Chocolate Peanut Butter Ganache:
- 10 ounces bittersweet dark chocolate chips
- 1 ¼ cup heavy cream
- 1 teaspoons unsalted butter
- ¼ cup peanut butter
Instructions
- Preheat the oven to 350 degrees F.
- Remove the paper from the outside of your empty cans and clean them well. Grease and flour the inside of the cans. Set aside.
- In a large bowl, combine sugar, flour, unsweetened cocoa, dark cocoa, baking soda, and baking powder. Whisk the dry ingredients until they are well distributed.
- Add the eggs, coffee, buttermilk, oil, and vanilla to the dry mixture. Using an electric mixer, beat for 2-3 minutes, or until there are no lumps. The batter will be quite thin compared to typical cake batter.
- Pour the batter into the cans, filling each about half-way.
- Bake for about 25-30 minutes, or until a toothpick inserted into the center of the cake comes out clean.
- As you wait for the cakes to bake, make the Peanut Butter Frosting. Using an electric mixer, beat the butter and peanut butter together in a medium sized bowl.
- After the butter and peanut butter are well combined, slowly add the powdered sugar as you continue to beat together the ingredients. Then, add the milk, and beat until the frosting reaches your desired consistency.
- When cakes have finished baking, be sure to let them cool completely. You may then either remove them by popping them out of the can, or if you are having difficulty, use a can opener to open the other side of the can and then push them out. Either way, be careful of sharp edges!
- After you have removed the cakes, you will notice that the top of the cake tower is rounded, like a cupcake or muffin top. Carefully and evenly cut this part off, so you are left with an even cylindrical cake. Then, cut the cake into equal layers. I cut mine into 4 layers. Try to cut them evenly, as uneven layers may cause your cake to tilt.
- To frost in between the layers, pipe frosting around the edge of the top of one layer. Then, pipe another, smaller circle inside of that one. Using a knife, even out all of the frosting to get a smooth layer. You can simply slap on the frosting using a knife instead, if you’d like, but you will likely wind up with a much messier looking cake, as I found out the hard way.
- After you have topped each layer with frosting, re-stack them to assemble your layer cake. Place the tower cakes in the refrigerator as you make the ganache.
- To make the ganache, start by putting the dark chocolate chips into a large, heat-proof mixing bowl.
- Heat a small saucepan on low and add heavy cream, butter, and peanut butter. Stir constantly until the mixture is fully incorporated. Try not to let the mixture come to a boil.
- Pour the hot peanut butter mixture over the chocolate and whisk until all of the chocolate has melted and the ganache is smooth.
- Pour the ganache over each cake, and top with chopped dark chocolate peanut butter cups.
- Prep Time: 35 mins
- Cook Time: 35 mins
- Category: Dessert


Sandi @ My Culinary Escapades says
These look amazing! I love the combination of peanut butter and chocolate. A must try!
Sara says
What a wow dessert! Such a cute presentation, and looks absolutely decadent and delicious. 🙂
Marla Meridith says
Love this recipe! Will be linking back to this in my upcoming post 🙂
Mattock the Viking says
I saw your post on reddit and loved the idea. So I tried it with a different recipe - didn't have all the proper ingredients on hand. Frosting turned out a bit runny, and cake got overdone on the outside in order to get properly done on the inside. But moderately pleased with it as a first try. Will have to revisit it following your recipe. http://imgur.com/dpF1HL3
Morgan says
I'm sorry to hear that it didn't turn out exactly how you had expected!
Here are a few tips that might help the next time around:
1) As far as the over-baked outside issue goes, try baking at a lower temperature next time. If I'm not mistaken (I'm not looking at the recipe right now) I baked mine at 350 degrees F. Many ovens are different, so try 325 next time and hopefully you won't have that issue. Expect to bake it longer, though.
2) If your frosting turns out too runny, just add more powdered sugar to stiffen it up. You want the frosting in between the cake layers to be somewhat stiff in order to help hold it all together, and so that it doesn't smoosh out.
3) Covering the outside with frosting is a noble attempt, but if you want the drippy look like I have in my pictures, definitely go for a ganache the next time around. Frosting is a bit too heavy, and it winds up looking gloppy if it is poured over the way you can with ganache. If you'd like to frost the outside, try using this tutorial from Joy the Baker: http://joythebaker.com/2008/03/how-to-frost-a-cake-in-10-pictures/. It will require a thicker frosting, but is totally do-able!
That being said, it looks like the actual tower shape of your cake was really well constructed, and considering you went on a limb and used ingredients that you had on hand, I have to say you did a really good job! I hope that my tips help for next time around! =)
Laura says
What size cans did you use?
Morgan says
I can't quite remember but I believe they were the standard-sized corn cans (which I believe are 15oz cans).
Spencer @ Moo-Lolly-Bar says
Looks absolutely amazing! Almost too good to eat. Infact I am not even sure where I would start.
E Billie says
Going to make this for my daughter's high school fund raiser dessert auction. Dangerous to auction the first attempt! Hoping it's visually stunning and gets some good bids. Thanks for taking something called 'can cake' and makin' it classy. (I suppose it's best to steer clear of using dog food cans, right?)
Cindy says
I just made these and I am not sure what I did wrong. They spewed over the tops of the cans and and what was left in can would not firm up. I double checked the amts of the ingredients and cannot see a mistake. Theses look so amazing and I was so looking forward to having them for my son's birthday tomorrow night. Help!
Morgan says
Cindy,
First of all, let me say that I'm sorry the recipe didn't turn out for you! As far as what the issue could be, that's tough. With baking, there are so many little aspects that it's really difficult to diagnose without being there. I wonder if it has to do with the size or type of cans you used versus the ones I did, or perhaps the density of your 1 3/4 cups all purpose flour was less or more than mine. It's hard when you're not weighing flour for baking, as 1 3/4 cups could actually yield slightly different amounts. Also, did you make sure not to overfill the cans? They should only be filled about 1/2 way in order to ensure that they don't spill over.
I'm sorry I can't give you a definite answer for what went wrong, but hopefully we can figure it out together to avoid any issues in the future!
Ceilidh says
I am thinking of making these for a dinner party later this week. Do you think they would fare well made a day ahead?